
Wednesday, October 28, 2009
Sunday, May 10, 2009
Extools RX 1.0.3 for Microsoft Excel 2007

Extools RX is a add-in program for Microsoft Excel 2007 or above (Windows). It is designed to make your work with Excel more productive as it provides many features that make spreadsheet editing much easier.
*- Many tools and utilites that add power to Excel. They can be accessed from the Extools menu and also the worksheet pop-up menu.
*- “Undo” function is provided for many of the tools. (This feature is NOT available for any other FREE Excel add-in programs)
*- Extools is made up of many tools. No unnecessary tools are loaded during Excel startup, therefore speeding the startup process. During working, Extools will automatically manage its own memory usage. You do not need to manually unload any tools, it will be handled transparently in the background.
------------------------------------------------------------------------------------------------------------------------
New Installation Steps:
-----------------------
To complete installation:
1. Create a new folder and extract all the files into the folder. Example: "C:\extoolsrx"
2. Start Excel
3. In Excel, click the 'Office button -> Excel Options -> Add-Ins category -> Go button'
4. From the Add-Ins dialog box click 'Browse' and select the 'extools_rx.xlam' add-in file (it will be in the folder where you have extracted the Extools RX files)
Now the Extools RX add-in will be available everytime you start Excel 2007(or above).
---------------------------------------------------------------------------------------------------------------------------------
Extools RX is designed for Excel 2007 or above. download ..............
Link: http://www.easy-share.com/1905131963/Excel extools_rx.zip
Add-in for ms excell 2007 - Morefunc
 To use the functions, click on the Insert Function button of the Formula bar and select the Morefunc category.
With Excel 2007, you can also use the Morefunc menu added to the Formula tab of the Ribbon.
Download ...............
http://www.easy-share.com/1904779864/Morefunc.zip
Wednesday, March 4, 2009
ޝުކުރު ތަޢުރީފް ބޭނުންނަމަ ބަހާ، ކަމާ އެއްގޮތްކުރޭ!
ޝިކާރަކުރާ މީހެއްގެ ހަމަލައިން ފިލަންދިއަ ހިޔަޅަކަށް ދަރުކޮށަންހުރި މީހަކު ދިމާވިއެވެ. ސަލާމަތްކޮށްދޭން އެދި ބުނުމުން އެމީހާ ހިޔަޅުވެއްދީ ދަރުލާފައިހުރި ގެއަށެވެ. އެތާއެތެރޭގައި ފިލާއޮއްވާ ޝިކާރަވެރިޔާ އެހިސާބަށް އައިސް ދަރުކޮށާ މީހާކުރެން ސުވާލުކުރިއެވެ. " ކޮބާ! މިހެންލާފައި ދިއަ ހިޔަޅެއް ދުށިންތަ؟"
ދަރުކޮށާ މީހާ. " ނޫން ނުދެކެމޭ." އަނގައި ބުނަމުން އަތުގެ އިޝާރާތުން ދަރުތައްލާފައިހުރިގެ ދައްކާލިއެވެ. އެކަމަކު އެ ޝިކާރަވެރިޔާއަކަށް އެބުނި އެއްޗެއް ނޭގުނެވެ. ނަތީޖާއަކަށްވީ ހިޔަޅު ހޯދަން އޭނާ ހިނގާ ދިއުމެވެ.
މިހުރިހާ ކަމެއް ބަލަން ދަރުގޭގައި ފިލާއޮތް ހިޔަޅު ޝިކާރަވެރިޔާގޮސް އޮބާލާފިކަން ޔަގީންކޮށްފައި، ނިކުމެ އަނެއްކޮޅަށް ދާން ހިނގައިގަތެވެ. އެވަގުތު ދަރުކޮށާ މީހާ ހިޔަޅަށް ބުންޏެވެ. " ބަލަ ދަނީތަ؟ މިއޮށްބޮޑުކަންތައް ކޮށްދީ ފުރާނަ ސަލާމަތްކޮށްދިނީމާ އެންމެ ކުޑަމިނުން ޝުކުރިއްޔާއޭވެސް ބުނެ ނުލާތަ؟" މިއަޑަށް ހިޔަޅު އެނބުރި ބަލާލުމަށްފަހު އަނެއްކާވެސް ދާކޮޅަށް ހިނގައިގެންފައި ޖަވާބުދިނެވެ.
" ޝުކުރު އަދާކުރަންޖެހުނީހީ ބަހާ ޢަމަލާ ދެގޮތް ނުވިނަމަތާއެވެ. ކަލޭ ޖެއްސި ހުރިހާ ވައްތަރެއް އަހަރެން އޮތީ ބަލާށެވެ."
..............................................................................................................................................................................................................................................................................
މީހުން ކަމޭހިތާނީ އަދި ޝުކުރު ތަޢުރީފް ލިބޭނީ ތިމާގެ ޢަމަލުތައްވެސް ދައްކާ ވާހަކަތަކާ އެއްގޮތަށް ބަހައްޓައްޏާއެވެ. ޝުކުރު ތަޢުރީފް ބޭނުންނަމަ، ބަހާ ޢަމަލާވެސް އެއްގޮތަށް ބަހައްޓާށެވެ. އަދި ފެންނަ ފަރާތާއި ނުފެންނަ ފަރާތްވެސް އެއްގޮތަށް ބަހައްޓާށެވެ.
Friday, February 13, 2009
How to replace Boli font to any font you like…

2. Now download the font fixer.from either of these links.
Font Fixer 1.0.4i.exe (72 kilobytes)
Font Fixer 1.0.4i.zip (32.8 kilobytes) .
3. so you have downloaded the font fixer.now run it by double clicking the icon.

4. The thingy will open. Choose the default font ('MV Boli')...and choose the one you want to take it's place (in this case ..'Faruma'). and click the 'Fix It' button.

5. a message saying that it is all done and the damned boli font is saved elsewhere will show up...click 'ok'.

6. Again, (after you click ok). Another message will pop up...saying that you need to restart your computer.

Click yes.
7. Now you have restarted you computer.... CONGRATULATIONS!!!...you have successfully got rid of the damned Boli font. Try it……………..
SO LETS DO IT!..
2. Now download the font fixer.from either of these links.
Font Fixer 1.0.4i.exe (72 kilobytes)
Font Fixer 1.0.4i.zip (32.8 kilobytes) .
3. so you have downloaded the font fixer.now run it by double clicking the icon.
4. The thingy will open. Choose the default font ('MV Boli')...and choose the one you want to take it's place (in this case ..'Faruma'). and click the 'Fix It' button.
5. a message saying that it is all done and the damned boli font is saved elsewhere will show up...click 'ok'.
6. Again, (after you click ok). Another message will pop up...saying that you need to restart your computer.
Click yes.
7. Now you have restarted you computer.... CONGRATULATIONS!!!...you have successfully got rid of the damned Boli font. Try it……………..
Thursday, February 12, 2009
How to Hide Folders in Windows, new trick!
Today I will tell you how to hide your private folders in Windows using a unique new technique. There are many software that can do this job but unless you buy their licensed version, you can’t make use of their full functionality.
The tip I am sharing is completely new and different and will make sure the folder does not even show up in Windows search.
1- Go to C drive and make a new folder. For example, like I made a folder named etc85.

2- Now make sure to put all your private files and content inside this folder and then open Command Prompt.
3- Navigate to C drive using the cd.. command.

4- Type in the command attrib +s +h +r etc85 and hit enter.
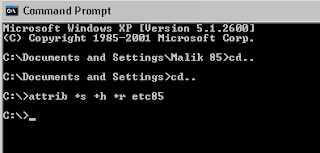
Thats it! your folder is now completely hidden from all users in all possible ways.
To unhide simply navigate to the same location in Command Prompt and type in attrib -s -h -r etc85. With this technique, no one can find your folder. Whether any one searches, does system restore or anything. Your folder is in complete privacy.
If you like this technique or have any difficulty executing it, just leave a comment.
Note: Make sure your own folder name in the command while executing it. Enjoy!
Today I will tell you how to hide your private folders in Windows using a unique new technique. There are many software that can do this job but unless you buy their licensed version, you can’t make use of their full functionality.
The tip I am sharing is completely new and different and will make sure the folder does not even show up in Windows search.
1- Go to C drive and make a new folder. For example, like I made a folder named etc85.
2- Now make sure to put all your private files and content inside this folder and then open Command Prompt.
3- Navigate to C drive using the cd.. command.
4- Type in the command attrib +s +h +r etc85 and hit enter.
Thats it! your folder is now completely hidden from all users in all possible ways.
To unhide simply navigate to the same location in Command Prompt and type in attrib -s -h -r etc85. With this technique, no one can find your folder. Whether any one searches, does system restore or anything. Your folder is in complete privacy.
If you like this technique or have any difficulty executing it, just leave a comment.
Note: Make sure your own folder name in the command while executing it. Enjoy!
Subscribe to:
Posts (Atom)
